커널 디버깅을 위해 설정하게 되었다. 아래의 내용들은 대부분 인프런의 내용을 참고하였다.
# wsl에서는 대소문자를 구분하지 않는 windows 파일 시스템으로 인해 빌드 과정에서 문제가 생긴다. 때문에 도커에서 빌드를 한 후 로드하는 방식으로 시도하였다.
0. 리눅스 커널 다운로드
이곳에서 원하는 버전의 커널을 다운로드 할 수 있다.
1. 도커 생성
# Dockerfile
FROM ubuntu:18.04

ENV DEBIAN_FRONTEND=noninteractive
WORKDIR /root

RUN apt-get update
RUN apt-get install tar gzip \
                    build-essential \
                    libncurses5-dev \
                    bin86 \
                    kernel-package \
                    libssl-dev\
                    bison \
                    flex \
                    libelf-dev -y

ENV kernel linux-6e1acfa387b9ff82cfc7db8cc3b6959221a95851.tar.gz

COPY $kernel .

# is gz
RUN mv $kernel kernel.tar.gz
RUN gzip -d kernel.tar.gz

# is xz
# RUN mv $kernel kernel.tar.xz
# RUN xz -d kernel.tar.xz

RUN tar -xvf kernel.tar
RUN rm kernel.tar

# wsl
docker build -t ssl:kernel .
docker run -it -d --name build ssl:kernel
압축 파일을 도커로 옮겨주도록 하였다.
docker ps -a위의 명령어로 아이디를 확인 후 아래와 같이 실행하여 도커를 실행 할 수 있다.
docker exec -it containerID /bin/sh2. 커널 빌드
make defconfig위의 명령어로 .config 파일을 생성 할 수 있다. 그 후 아래의 명령어를 사용하여 N개의 cpu를 사용해 커널 빌드를 시작 할 수 있다.
make -j N
# make -j $(nproc) <= 모든 cpu 사용
커널 빌드가 끝나면 vmlinux, bzImage 두개의 커널 이미지를 얻을 수 있다.
- bzImage는 vmlinux에서 순수하게Instruction set만 뽑아낸 이미지이다. /arch/x86/boot/에 위치해있다.
- vmlinux는 디버깅에 유용한 정보들이 살아있는 이미지이다.
나의 경우 wsl을 사용할 것이기에 로컬로 파일을 옮겨주었다.
mv ./arch/x86/boot/bzImage ..
mv vmlinux ..

# wsl
docker cp container_id:/root/bzImage .
docker cp container_id:/root/vmlinux .
3. 루트 파일 시스템 구축
1day 분석을 위해 Unix 시스템의 일부만 구현 되어있는 busybox가 아닌 데비안을 사용하기로 하였다.
여기에서 우분투 버전별 이름을 확인 할 수 있다.
IMG=qemu-image.img
DIR=mount-point.dir
qemu-img create $IMG 50G
mkfs.ext2 $IMG
mkdir $DIR
mount -o loop $IMG $DIR
debootstrap --arch <아키택쳐 이름> <우분투 버전 이름> $DIR
umount $DIR
rmdir $DIR
위와 같은 쉘코드를 사용하면 데미안 파일 시스템이 구축된 qemu-image.img가 생성이 된다.
초기 설정을 위해 mount 명령어를 사용하였다.
# 마운트 할 디렉토리 생성
mkdir mount_point

mount qemu_image.img mount_point
cd mount_point
chroot .
# 설정
adduser ubuntu
# -> ubuntu계정 생성

usermod -aG sudo username
# usermod -aG sudo ubuntu

passwd root

# 추가적인 설정들
# ex) apt-get install net-tools -y
exit

cd ..
umount mount_point
4. qemu 실행
qemu-system-x86_64 \
-kernel ./bzImage \
-append "root=/dev/sda rw console=ttyS0 nokaslr" \
-netdev user,id=t0, -device e1000,netdev=t0,id=nic0 \
-s \
-m 4096 \
-hda qemu-image.img \
--nographic \
위의 쉘코드를 실행하여 qemu를 실행 할 수 있다.
- -s : 1234 포트 열기
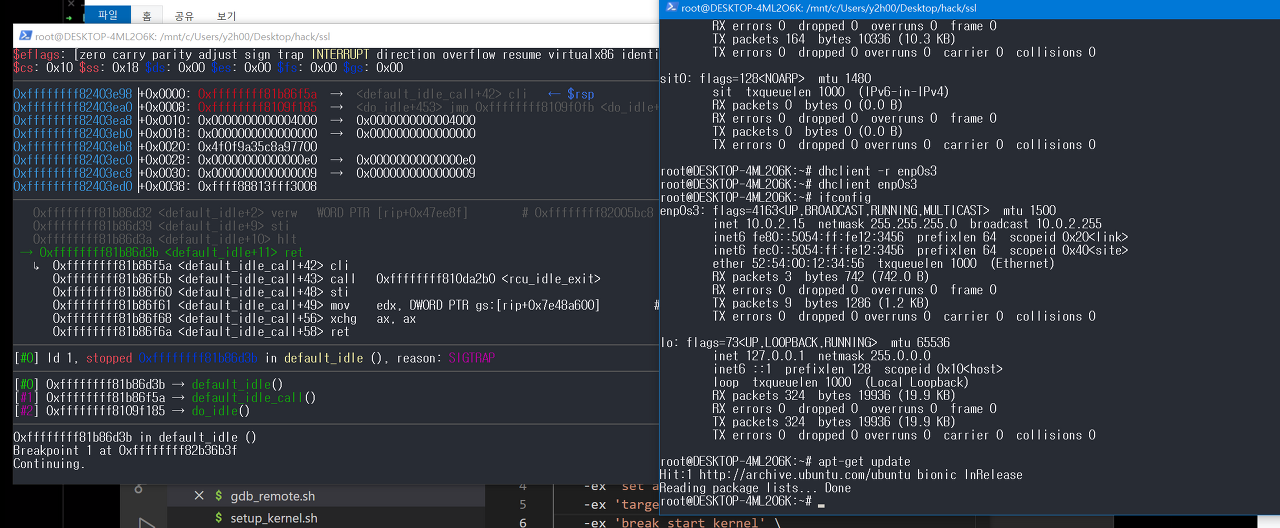
5. 네트워크 설정
qemu의 네트워크 설정을 위해 아래의 명령어를 사용하여 네트워크 구성 정보를 확인하였다.
ifconfig -a나의 경우 enp0s3에 inet4가 없어 추가적으로 설정해주었다. ✅
dhclient -r enp0s3
dhclient enp0s3
6. gdb_attach.sh 생성
gdb \
    -ex "add-auto-load-save-path $(pwd)" \
    -ex "file vmlinux" \
    -ex 'set arch i386:x86-64:intel' \
    -ex 'target remote localhost:1234' \
    -ex 'break start_kernel' \
    -ex 'continue' \
    -ex 'disconnect' \
    -ex 'set arch i386:x86-64' \
    -ex 'target remote localhost:1234'
1234 포트에 gdb attach를 하는 쉘 코드이다.
실행시 아래와 같이 attach가 되는 모습을 볼 수 있다.
7. 기타 정보
● apt-get install이 작동 안하는 문제 ✅
/etc/apt/sources.list 파일에 아래의 내용을 추가한다.
deb http://archive.ubuntu.com/ubuntu bionic main restricted universe multiverse
deb http://archive.ubuntu.com/ubuntu bionic-security main restricted universe multiverse
deb http://archive.ubuntu.com/ubuntu bionic-updates main restricted universe multiverse
● pwn을 위한 wsl 기본 설정 ✅
아래는 pwn을 위한 기본적인 설정을 하는 쉘코드이다.
cd /root
path=$(pwd)

if [ ${path} != '/root' ]
then
       echo 'Error'
       exit
fi

apt-get update
apt-get install -y netcat

apt update
apt install curl git wget file zsh sudo vim libssl-dev libffi-dev build-essential libssl-dev libc6-i386 libc6-dbg gcc-multilib make gcc gdb -y
apt install python python-pip git curl wget vim zsh gdb python3 python3-pip -y

dpkg --add-architecture i386 &&\
       apt-get update
apt-get install python3-dev ruby binutils-multiarch -y
apt-get install libc6:i386 libncurses5:i386 libstdc++6:i386 ruby-full python-dev python-setuptools python-capstone socat -y
gem install one_gadget seccomp-tools

python3 -m pip install --upgrade pip
pip3 install unicorn
pip3 install keystone-engine
pip3 install ropgadget

pip3 install pwntools

wget -O /root/.gdbinit-gef.py -q https://raw.githubusercontent.com/hugsy/gef/dev/gef.py
echo source /root/.gdbinit-gef.py >> ~/.gdbinit

wget https://github.com/robbyrussell/oh-my-zsh/raw/master/tools/install.sh -O - | zsh || true
mkdir -p "$HOME/.zsh"
git clone https://github.com/sindresorhus/pure.git "$HOME/.zsh/pure"
echo "fpath+=("$HOME/.zsh/pure")\nautoload -U promptinit; promptinit\nprompt pure" >> ~/.zshrc

git clone https://github.com/zsh-users/zsh-syntax-highlighting.git
echo "source ./zsh-syntax-highlighting/zsh-syntax-highlighting.zsh" >> ~/.zshrc

git clone https://github.com/zsh-users/zsh-autosuggestions ~/.zsh/zsh-autosuggestions
echo "source ~/.zsh/zsh-autosuggestions/zsh-autosuggestions.zsh" >> ~/.zshrc
echo "ZSH_AUTOSUGGEST_HIGHLIGHT_STYLE='fg=111'" >> ~/.zshrc

echo "syntax on\\nfiletype indent plugin on\\nlet python_version_2=1\\nlet python_highlight_all=1\\nset tabstop=8\\nset softtabstop=4\\nset autoindent\nset nu">>~/.vimrc
gef의 경우 홈 디렉토리의 .gdbinit의 파일을 사용하기에 루트가 아닌 다른 유저에서 gef를 쓰기 위해서는 아래의 명령어를 추가적으로 실행해야 한다.
wget -O ~/.gdbinit-gef.py -q https://raw.githubusercontent.com/hugsy/gef/dev/gef.py
echo source ~/.gdbinit-gef.py >> ~/.gdbinit
● gcc 버전이 맞지 않는경우 ✅
find . -name compiler*위의 명령어로 사용 가능한 gcc 버전을 대략적으로 확인 할 수 있다.
apt-get update && \
apt-get install gcc-4.8 -y && \
update-alternatives --install /usr/bin/gcc gcc /usr/bin/gcc-4.8 50 && \
update-alternatives --config gcc
위는 4.8버전 gcc를 다운로드하고 적용하는 코드이다.
'커널' 카테고리의 다른 글
| WSL 같은 버전 여럿 만들기 (1) | 2022.09.21 |
|---|